Do you have old works that you no longer want on display? Or something more recent that just didn't work very well and is never going to get out of the closet? What do you do with them?
I have two pieces that I made last year that I think are so, well, awful, that I've never displayed them. I've pulled them out occasionally to think about what I could do to redeem them but never came up with anything that would improve them. Then I got this book The Painted Quilt by Laura and Linda Kemshall. It has a wealth of ideas about adding or subtracting color to a piece after the quilting has been done. Ah-ha! I have something already quilted that is a perfect candidate for trying out these processes. It's a lot of work to quilt something up just to try out some new techniques, especially when they might take a little practice to perfect. But it doesn't take much time at all to cut up some old work into squares and stitch around the edges. Now I have more than a dozen one foot squares, plus some smaller pieces, to play with these new techniques.
Some of the processes involve removing color with bleach or thiox but my practice pieces are pale yellow and pink (part of the problem) and removing color isn't going to remove very much. But I will still try it, what have I got to lose?
Showing posts with label Techniques. Show all posts
Showing posts with label Techniques. Show all posts
Monday, July 21, 2008
Sunday, December 16, 2007
The Finishing Touch
This is a much better illustration of this edge finishing technique I'm working on. The first image is the quilt top quilted nearly up to the edge of the quilt; the batting and backing are still untrimmed.

The second picture shows the batting trimmed away just slightly smaller than the top (mostly) and the backing trimmed to 3/4" wider.

A 3/4" wide strip of Wonder Under is applied to the backside of the backing.

The paper is removed and the 3/4" strip is folded back and fused down.

This is the view from the front; the backing is turned back and fused so it isn't visible.

Another view of the top.

To secure that little bit of top along the edge, I quilted a continuation of the grid that was already there, taking the stitching off the edge which closes the gap between the top and the backing and hiding the batt.

This is what the back looks like. The finishing grid isn't as wide as the turned back edge, so every inch or so, I stitched a little further into the quilt to make sure that turned back edge doesn't come up. Click on the picture for a larger image.

We never made our planned to Chicago last weekend. The weather predictions of icy mix across Ohio, Indiana, and Illinois just didn't sound like a situation in which we wanted to be driving. So it will have to be later. It's difficult to plan a trip at this time of year, what with the iffy weather and the holidays. We thought about flying out and renting a minivan to drive back even though that would be a lot more expensive. The only problem is that we would need the space in the back and so what would we do with the seats?
Now that it's the end of the year it's time for looking back over what I've accomplished in the past 12 months. I'll come up with numbers of shows entered, number of acceptances, and shows I've been in. I feel that this year I've sort of drifted along in the getting sales category. I haven't pursued much in the way of opportunities and the bottom line is reflecting that. I don't like to show a loss and can usually restrain my spending so that it doesn't overshoot my income but obviously I wasn't paying very close attention this year. Not too big of a loss, only a few hundred dollars. Next year I will do better.


Monday, December 03, 2007
Finishing
I've been busy the past few weeks quilting on two pieces. I tried a new edge finishing technique on them and I think I like it better then the facing technique I was using. Which involved a lot of sewing of mitered corners, moving back and forth from the work table to the sewing table way too much, and hand finishing. Plus I don't like how it offsets the fabric boundaries.
This new technique which I learned from my friend Elizabeth Poole and modified a bit. I tried two methods, the modified one first. For the first, I cut strips of the backing fabric about 1.5 inches wide and put wonder under on them. I scored the wonder under down the middle and pulled off the paper. So what was left was the strip with wonder under exposed on half of it, the long way. Next step was to trim the quilt to its edges. I had already quilted most of the piece but left the outside 2 inches or so unquilted. Next, I slipped the exposed wonder under strip edge under the quilt top and over the batt, lining it up so that the papered half stuck out. Then fused it. The took the remaining paper off, turned the strip to the back side, and fused it. The result was that the batt was encased in the strip and since I used the backing fabric, it was nearly invisible. After I finished quilting the outer edges, the strip disappeared on the backside and no batt was visible.
The big problem with this technique is that it really distorted the quilt edges and they were very wavy. I really hate wavy edges, they drive me nuts. So I laid the quilt out on my work table, dampened it, and then steam pressed it flat. This seems to have worked.
This new technique which I learned from my friend Elizabeth Poole and modified a bit. I tried two methods, the modified one first. For the first, I cut strips of the backing fabric about 1.5 inches wide and put wonder under on them. I scored the wonder under down the middle and pulled off the paper. So what was left was the strip with wonder under exposed on half of it, the long way. Next step was to trim the quilt to its edges. I had already quilted most of the piece but left the outside 2 inches or so unquilted. Next, I slipped the exposed wonder under strip edge under the quilt top and over the batt, lining it up so that the papered half stuck out. Then fused it. The took the remaining paper off, turned the strip to the back side, and fused it. The result was that the batt was encased in the strip and since I used the backing fabric, it was nearly invisible. After I finished quilting the outer edges, the strip disappeared on the backside and no batt was visible.
The big problem with this technique is that it really distorted the quilt edges and they were very wavy. I really hate wavy edges, they drive me nuts. So I laid the quilt out on my work table, dampened it, and then steam pressed it flat. This seems to have worked.
 This is the back (lime green) folded across the front. You have to look closely to see the folded back edge.
 This is the edge on the front side. You can see the green strip here, but most places it's not visible. This could be a problem if the strip was some wildly different fabric from the front.
For the second piece, I didn't used the wonder undered strip. Quilted to the edge this time only leaving about 1/4" undone. This time I trimmed away the batt so that it was just slightly smaller than the top. Then trimmed the backing fabric to about 3/4" wider than the quilt. Applied wonder under to the backside of this strip, turned it to the back and fused it. Now I went around the entire outside of the quilt and adding enough stitching to ensure the back strip stayed down and also to close the gap between the top and the back so the batt couldn't show. Here's the edge from the front side.
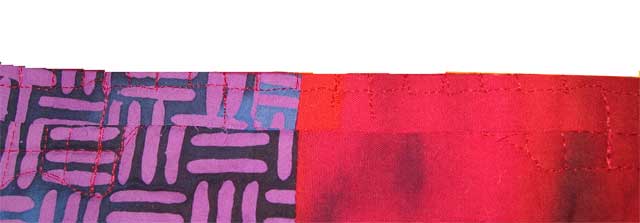 And from the back. You can see the folded back strip better here, partly because the edge stitching was done after the top had been quilted and so it doesn't cover the entire strip.
This second method did not distort the top at all. Both methods leave the edge rather fragile since they don't have the support of a facing, so time will tell how well I like how it holds up. I like the look.

This is the backside of the faced quilt. It's a very neat finish, but very time consuming.
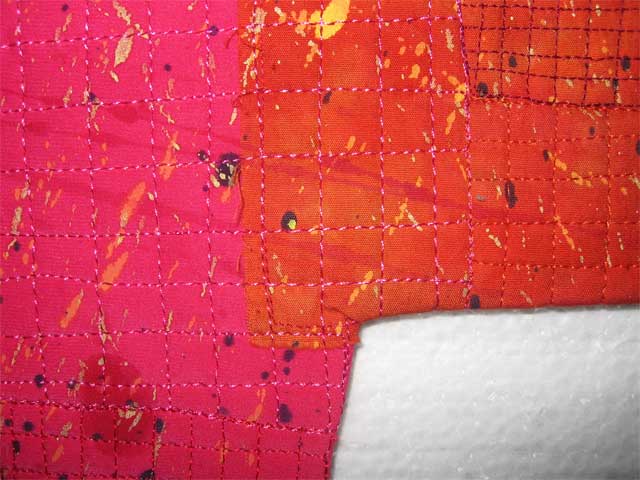
This is what I mean about the fabric edges becoming offset. I don't like this, which is the major drawback to this method for my style of quilt. If I didn't have the irregular edges it wouldn't be an issue.
This coming weekend my husband and I are driving to Chicago to take some furniture that my Mother no longer needs and it doesn't fit into her studio. We are renting a minivan since neither of our cars is big enough to hold a dresser plus the other stuff. I don't much enjoy the drive and I sure hope the weather is good and the ice storm this past weekend doesn't repeat itself. We thought about flying out and renting the car to drive home but it costs more to rent a car one way for two days than it does to round trip it for four days. I guess they like their cars to always come back home.
Subscribe to:
Posts (Atom)





